Cranleigh Railway Line:
The Guildford and Horsham Direct Railway. ~ 1865 to 1965
Cranleigh Station Totem
 

Signal Post
About Cranleigh Railway Station About Cranleigh Railway Station
Maps of the Cranleigh Railway Line Maps of the Cranleigh Railway Line
Cranleigh Railway Line History Cranleigh Railway Line History
Cranleigh Railway Line Photos - Then & Now Cranleigh Railway Line Photos - Then & Now
Re-Opening the Cranleigh Railway Line Re-Opening the Cranleigh Railway Line
Cranleigh Railway Line Ephemera Cranleigh Railway Line Ephemera
Cranleigh Railway Line Rolling Stock Cranleigh Railway Line Rolling Stock
Articles about the Cranleigh Railway Line Articles about the Cranleigh Railway Line
Signal Post
Signal Post
 
  
WEBSITE BUILT BY
CHEESE MEDIA


PHOTOS THEN AND NOW:
Guildford Station
Peasmarsh Junction
Bramley & Wonersh Station
Cranleigh Station
Baynards Station


Peasmarsh Junction

Peasmarsh Junction is where the Cranleigh line met the main Waterloo to Portsmouth line. A few hundred yards further on towards Guildford, the Gatwick line also joins the main line, causing some confusion, as they both had signal boxes named 'Peasmarsh Junction' for a while, until the Branch's box was renamed 'Peasmarsh South'.

In 1926, 'Peasmarsh South' signal box was demolished, and the 'double track' junction was changed to a single track, leading off on the branch line to Horsham.

In late 2004 and early 2005 The national Trust and the local council renovated the track bed from here to Bramley station. (photos to follow soon) Trees have been cut back, and gravel laid, and planning permission is being sought to rebuild the bridge across the river wey.

Peasmarsh Junction in the early 1960's - looking South Peasmarsh Junction in 2001 - looking South
Past & Present Publishing
Photo used with permission © Terry Gough
  Cranleigh Railway Dot Info - 2001
At first glance, no evidence of the branch line, only the road bridge and weyside hut give the location away. The photo is taken with our back to Guildford, with Portsmouth through the bridge.
 
 
Peasmarsh Junction in the early 1900's - looking North Peasmarsh Junction in 2001 - looking North
Oakwood Press Cranleigh Railway Dot Info - 2001
The story is the same from the road bridge, the signal box has gone, so has the house just to the right and behind. Leaving little evidence of the junction.
 
 
Peasmarsh Junction disgarded rails
Cranleigh Railway Dot Info - 2001
Closer inspection shows some lengths of line where the signal man's crossing was. There are slight remains of rotting 'walk boards' but these pieces of line were left, complete with rail chairs.
 
 
Peasmarsh Junction disgarded rails
Cranleigh Railway Dot Info - 2001
A tree has grown around the nearest two, fixing them in place for the foreseeable future!
     
     
Peasmarsh Junction handing over the single line token - early 1960's
Cranleigh Railway Dot Info - Archive Photograph
Photo used with permission © Norman Hamshere
 

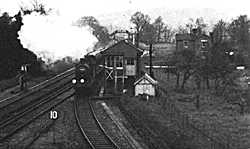
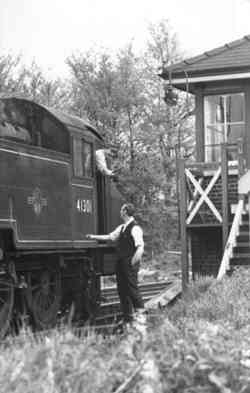
The Cranleigh Line was single track, with passing loops at most stations. Because of this, the trains were given a 'staff' at various locations allowing it to travel along that section of line. So two trains could never have a staff for the same section of line, supposedly making collisions impossible.

Here the driver seems to be giving or collecting a staff from the Peasmarsh signal man.


Railway bridge over the River Wey in the early 1960's Railway bridge over the River Wey in 2001
Past & Present Publishing
Photo used with permission © Terry Gough
Cranleigh Railway Dot Info - 2001
Just south of Peasmarsh Junction, the line had to cross the 'River Wey'. Although the bridge itself was removed shortly after the closure of the line, the two brisk retaining walls can still be seen on either side of the river.